
Swift, Cascade, Centurion, and Takila. What do these words have in common? They're among the over 200 default Procreate brushes artists can choose from.
When it comes to a digital artist’s tools, few things are more important than the brushes they use. But did you know that it's the Brush Studio that powers every brush in your library?
With it, you can craft your own custom brushes and make something completely unique to how and what you create. Custom brushes let you be strategic with your creativity. You gain control over your strokes and can tweak brushes to your needs in the moment.
To do it, you just need to master the settings.
Even with over 100 customizable settings, you only need to know a fraction to achieve beautiful results. We'll look at two ways to create custom Procreate brushes in the Brush Studio and highlight which settings to focus on.
Ready? Styluses up!

What is the Brush Studio?
Procreate’s Brush Studio is where you can pull back the curtain on the settings of all the current brushes in your library and fine-tune your own. Its magic lies in a combination of creativity, luck, and experimentation.
The Brush Studio can be broken down into three sections: Attributes, Settings, and Drawing Pad. The Attributes are 14 points of customization. Your Settings are where you adjust each of your Attributes using various sliders and settings. The Drawing Pad is where you can test your brushes without leaving the Brush Studio. You can test your brushes in a select range of colors, on a sample 3D object, or at different sizes.
But going into 14 different ways to customize a brush definitely sounds overwhelming. Let's take a look at key features in the Brush Studio settings.

Learning the Settings
There are hundreds of settings in Brush Studio that you can use to edit your brushes. If you spend your time obsessing over each one, you’ll never finish making a brush. To get results quickly and efficiently, you only need to start with five key brush settings.
Shape Source
You can think of this as a stamp that will define the shape of your brush. With this setting, you can import a new file or photo or use Procreate's library of pre-defined shapes.
You’re shaping your brush’s silhouette, a.k.a. the edge and weight of every stroke it makes. You’ll see this when you turn on brush preview and hover your Apple Pencil over the iPad screen. Depending on how you end up using your brush, this outline and profile might matter more to you. For example, if you're using your brush primarily as a stamp, having a specific shape is critical for it to read properly.
Grain Source
This is where the texture of your brush comes from. It's overlaid on each brush stroke and contained within the Shape you’ve defined.
As you draw, you’re dragging a combination of the shape and the texture along your stroke path. Like the Shape Source, there is a library of pre-defined textures to choose from in Procreate if you don’t want to start from scratch.
If you want to use your own texture, it helps to be strategic about the grain that you choose. When choosing a grain source, you'll find that the balance between light and dark in your image will change the overall texture of your brush. This is because the Brush Studio interprets your grain source in grayscale. You can use a two-finger tap gesture in the Grain Editor menu on your grain image to automatically invert the light and dark areas of your image.
Stroke Path
This is about how your brush stroke will behave when you’re drawing. Your Stroke Path can be edited using settings like Spacing, Jitter, and Fall Off.
Spacing is how far apart your brush stroke stamps will be from each other. This could be what creates a dotted line brush versus a smooth, even stroke.
Jitter adds randomness to the way your shape is scattered along your line. You can think of it like spray paint, where your paint is scattered around your strokes. Increasing these settings gives you more variation, with additional options for how the shape scatters along and across your stroke.
Fall Off starts your stroke at full opacity and then slowly fades it to zero at the end of the stroke. The higher your Fall Off percentage, the more faded your stroke will be.
Apple Pencil Settings
Your Apple Pencil model matters. The newer the Pencil (1st gen, 2nd gen, Pro), the more customization options you’ll have. (If you have a third-party stylus, just note that it may not support all of these features.
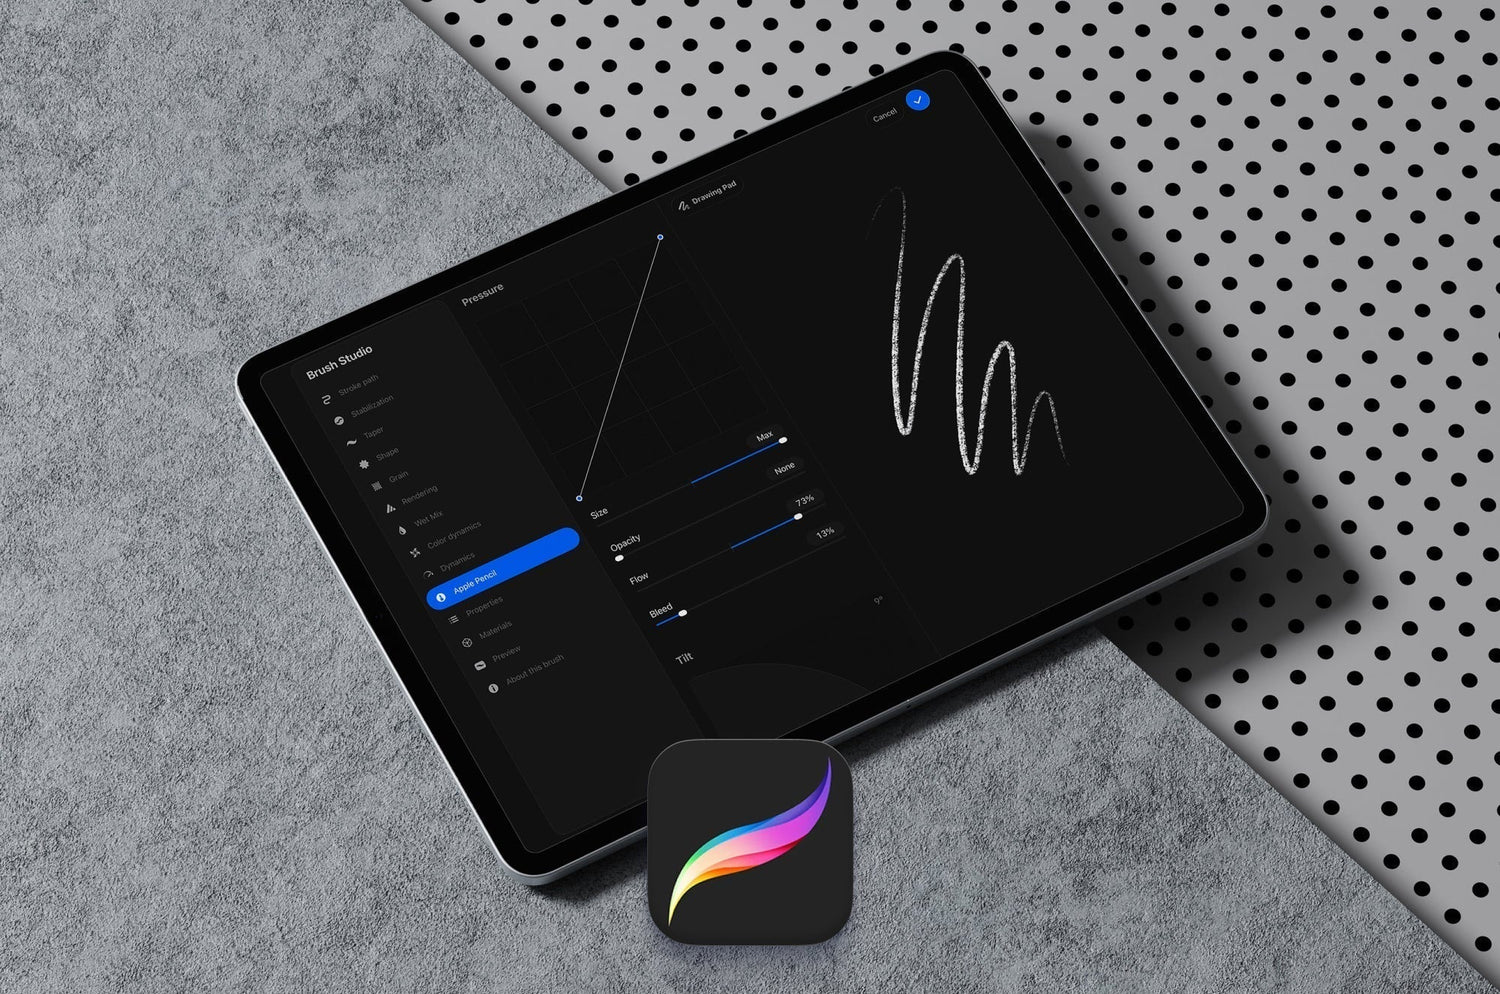
Under the Apple Pencil settings, you’ll find a few different sections: Pressure, Tilt, Hover, and Barrel Roll.
It starts with the Pressure Graph at the top of the menu. When you press down on your pencil, you can change the way your brush stroke behaves. All of the settings beneath it depend on how you've drawn your pressure curve. By default, it's a steep line, representing a high degree of pressure sensitivity.
The settings below your pressure graph (Size, Opacity, Flow, and Bleed) control how your brush behaves under pressure. Size is how large or small the tip of your brush becomes (the bigger the size, the thicker the stroke). Opacity is how transparent or opaque each stroke is. Flow determines how much paint your brush lays down as you draw. Bleed is how much your brush spreads outside the edges of the brush.
Your ability to edit Tilt, Hover, and Barrel Roll settings depends on your Apple Pencil model. Tilt will affect how tilted the pencil needs to be before the tilt settings activate. Hover can change the opacity of the brush preview cursor while hovering near the screen. Barrel Roll can change the way the pencil responds to brush size, opacity, and bleed when rotating the pencil. Barrel Roll is a setting that’s exclusive to the Apple Pencil Pro. You can learn more about the Apple Pencil Pro settings for artists using Procreate.
Rendering
We’ve seen a lot about how your brush stroke will look, but what about when it’s time to actually draw and color? The Rendering Mode controls how your brush strokes interact and behave with one another. With six rendering modes for your brush, you might get stumped with which one to choose.
Think of it like you're working with paint.
The lightest rendering mode is Light Glaze. This is like using watered-down paint, where your strokes appear light and more transparent. The strongest rendering mode is Intense Blending, which is more like using thick paint with strong paint mixing and less stroke transparency.
Now that you’re more familiar with the key Brush Studio settings, let’s see how to build our own Procreate brush.

Building a textured inking brush
It's time to take what we've learned and put it into action. Let's say that we want to create a textured inking brush in Procreate, for example.
Inking brushes are great for linework, detail, and sketching. But let's say you want a brush that adds grit and more personality to your linework. The brushes you find in the Inks category in Procreate have great edge texture, but they don't have the level of visible grain within the stroke you're looking for. To create a textured inking brush, you can start by making your own ink markings on a sheet of paper.
For my brush, I scribbled using a marker and an ink pen on a piece of paper. Then I photographed it with my iPhone, making sure no shadows obscured the image.
Note that when you import your grain image, the Brush Studio will interpret it based on its light and dark areas. When you're editing the Curve settings of your photo, be careful not to overcorrect, or you could lose important details used to build your brush.
Create your own textured inking brush in Procreate:
- Take a photo of your texture.
- Open a square canvas (3000x3000px).
- Go to the Actions panel and select Insert a photo.
- Expand the size of the photo to fill the canvas.
- Go to the Adjustments panel and go to Hue, Saturation, and Brightness to desaturate the image.
- Go to the Curves panel and move the nodes to the middle of the graph.
- Tap the layer and hit Copy.
- Hit the ‘+’ in the Brush library to create a new brush.
- Go to the Grain Attribute and paste your image.
- Test your brush on the Drawing Pad as you adjust your brush settings.
If you want an even stroke, I suggest using a simple shape, like a solid circle. This is the default shape for all brushes and will give you a strong base to start with.

Remember when I said that the Brush Studio cares about how light or dark your grain image is? I saw that when the majority of my photo was white, it looked different than when it was black. This took some additional experimentation, but it was good to play around with.
I also found that playing with the scale of my Grain source helped me adjust the overall feeling of the texture in my final brush.

Your process might vary slightly from mine. Use what I did as a guide and then find your own way to make the perfect inking brush.
Watching the process of professional Procreate brush makers on YouTube showed me that everyone's process for creating is different, and that's part of the magic.
Now that you can build your own brush from scratch, let's look at how to edit the settings of an existing brush in Procreate.

Modifying an Existing Brush
A lot of the brush modification process is about loving certain aspects of a brush, and simply asking yourself, “What if it could do this?”
Reverse engineering a brush in Procreate is a great way to start learning how brushes work. You'll be able to study the way that they were built and use that to inform your own decisions for making modifications.
When Procreate updated to version 5.4, it included 180 new brushes by Kyle T. Webster. These are a great place to start. You can find them under the Procreate Library. Start going through the categories and see what stands out to you.
Create your own modified brush in Procreate:
- Duplicate the brush you want to edit.
- Go to the Drawing Pad and start drawing with the brush to test its current settings.
- Note the properties you want to adjust.
- Adjust the Grain source with your own image.
- Add or reduce the stroke stability in Streamline.
- Adjust the pressure sensitivity.
- Continue to test on the Drawing Pad until you've achieved the desired result.
When duplicating a brush, a good rule of thumb is to rename it to indicate the changes you made. This way, you’ll remember the difference between the modified brush and the original brush.
Try activating some of the newer brush features and settings introduced with the Apple Pencil Pro, like Barrel Roll. There are many brushes that were developed before the newer pencil technology was rolled out, so it has the potential to yield interesting effects.
For me, I enjoy introducing taper and pressure sensitivity to brushes without those settings to make them feel closer to brush pens. Increasing the StreamLine is also great for drawing a more stable stroke.
Use your own artistic style and preferences to inform your changes and see where you land. You might just be a few tweaks from creating your new favorite brush.

FAQ
Can I make my own Procreate brushes?
Yes! Procreate's Brush Studio is where you can go to make your own brushes or edit existing brushes from their library. These are some of our favorite custom brushes from artists in our community.
How do I organize the brushes I'm creating?
It's a good idea to create a new set so that you have all of your brush experiments in one place. If you ever lose track of your brushes, you can also search for the names of brushes in the Search bar.
What's the best way to master digital brush making?
Like most things, you just have to do it. You'd be surprised how many of your favorite brushes might have come from happy accidents. That being said, there are plenty of resources on YouTube by artists we admire. To master Procreate, check out these helpful tips all artists should know.
How do I create my own modified brushes without losing the original?
To not lose the original brush you're editing, it's best practice to swipe left and duplicate it. From there, you can rename the brush to make sure you don’t confuse it with the original. To see if Procreate is the digital art program for you, learn more about it.
How do I sell my own brushes?
There are many marketplaces and platforms for selling your brush creations. You can use platforms like Creative Market or Etsy to get your work in front of a large audience. You can also host them on your own website as a digital download.
Wrapping Up
In the beginning, it's a good idea to learn the basics and to treat brush making as a journey towards something unexpected. That’s what worked for me, at least. Every outcome taught me something, even if I didn’t achieve the brush effect I was looking for.
As you get more comfortable with the Brush Studio, you'll learn how to harness its power and get the results you want.
Until then, embrace being a beginner and always use the Drawing Pad to test out your strokes. You’ll also benefit from learning from the amazing community of Procreate artists who have become experts in brushmaking.
For inspiration, download the free Procreate brushes that Paperlike recommends, created by our ambassadors.


