iPadOS 26 is the first update in 15 years that’s actually changed how you use the device.
I mean, sure, Apple has added a ton of new features and massively upgraded the hardware during that time, but the core experience stayed the same. You open an app, work in it, then switch to something else.
But with iPadOS 26, Apple is finally treating the iPad like a workspace instead of just a big phone. Now you can have multiple things going on at once. Full Screen, Windowed Apps, and Stage Manager make the iPad feel more like a laptop.
The problem is, Apple doesn’t really explain when to use which.
Here’s how to make sense of it.
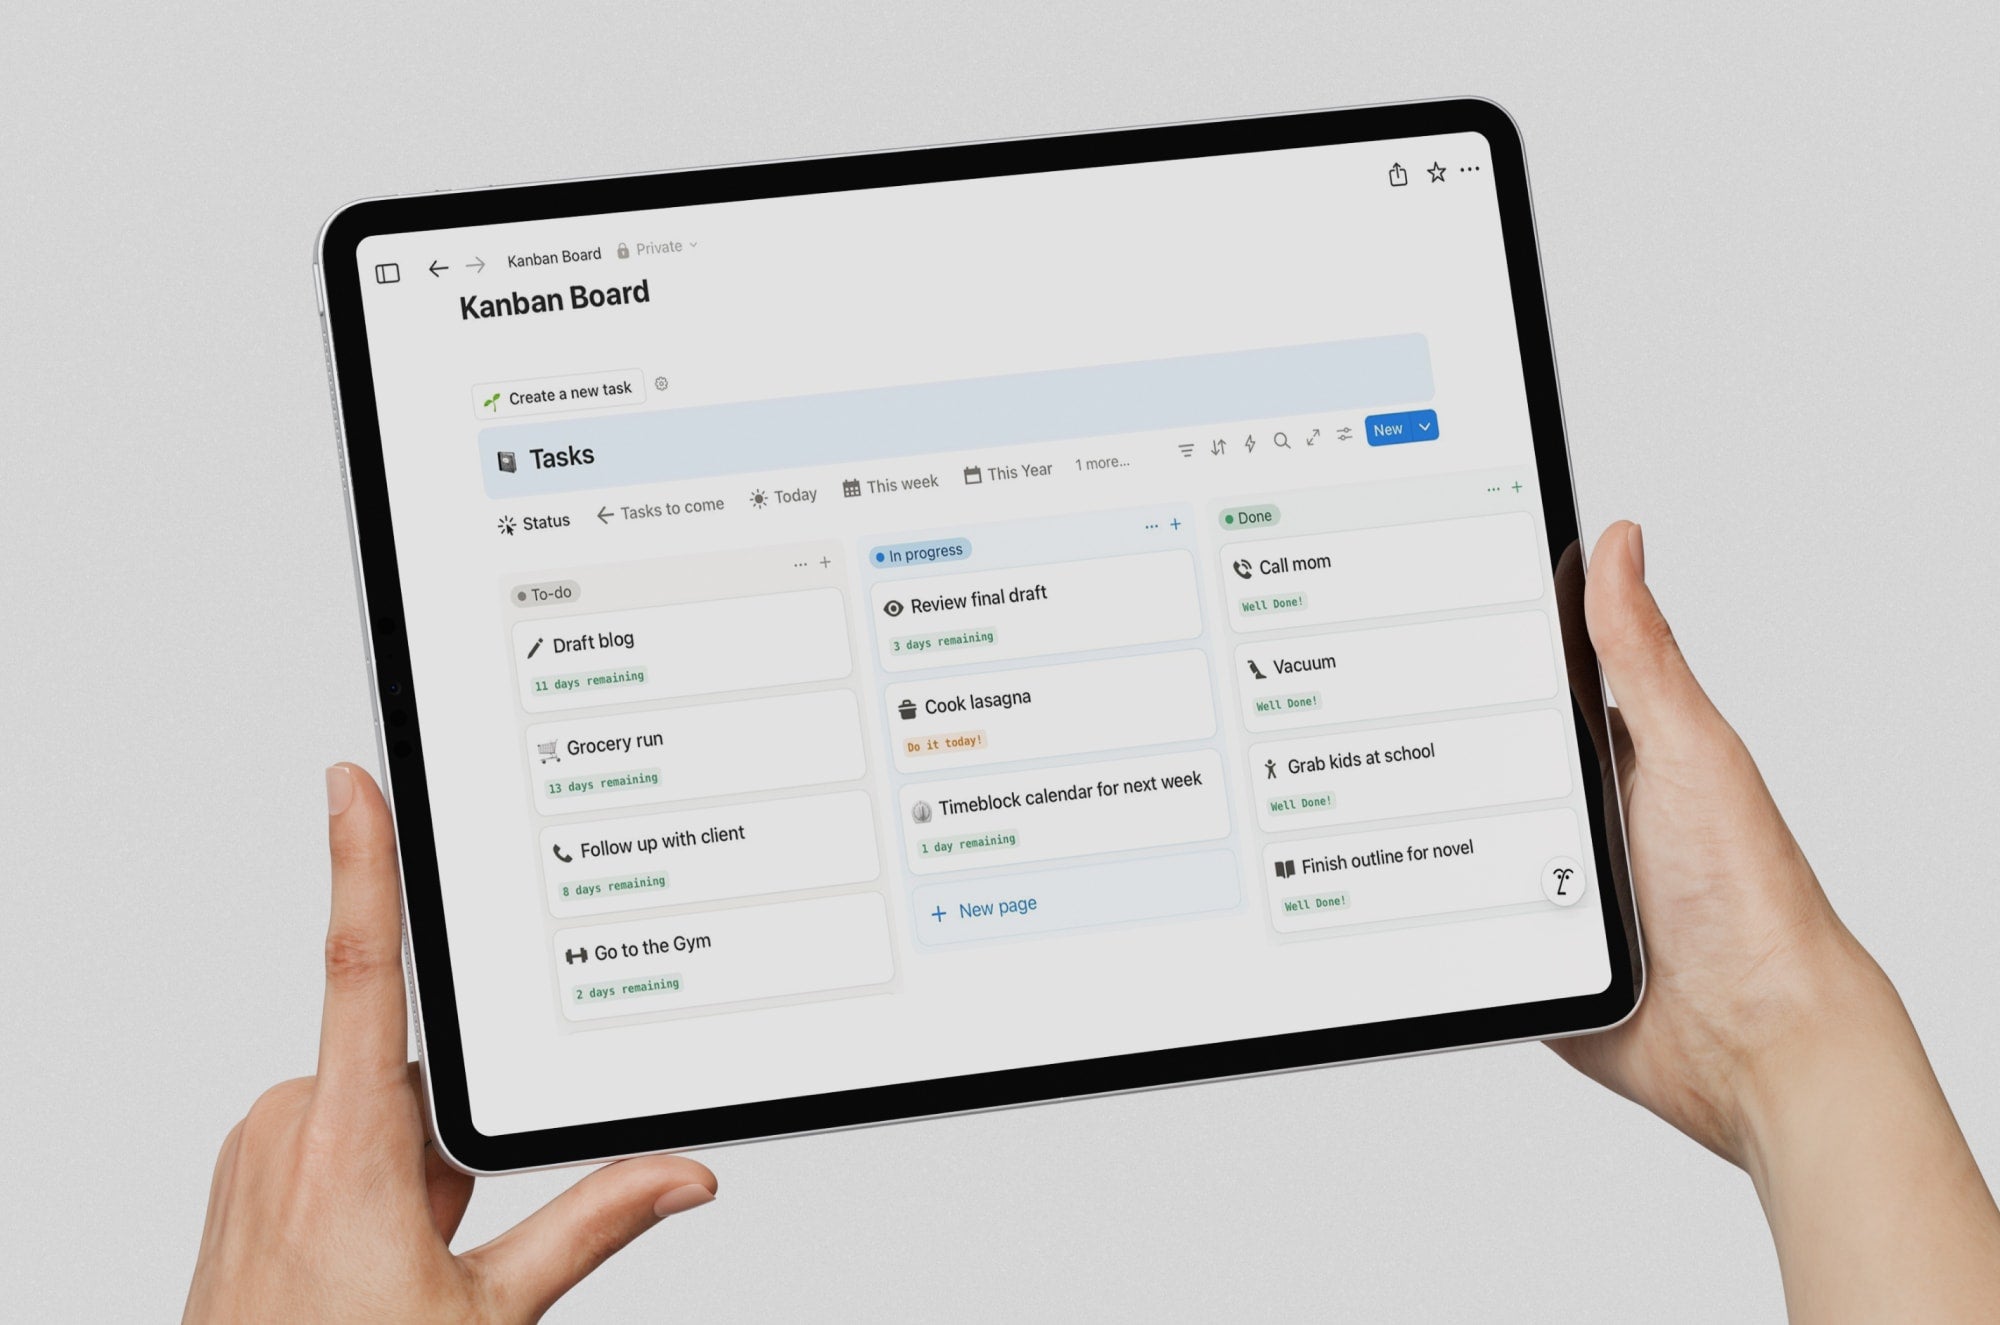
The three multitasking modes at a glance
Before we get into too much detail, here’s a quick look at each of these modes:
| Mode | What it is | Works best for |
| Full Screen | One app takes up the entire screen with no distractions. | Writing, reading, or drawing. |
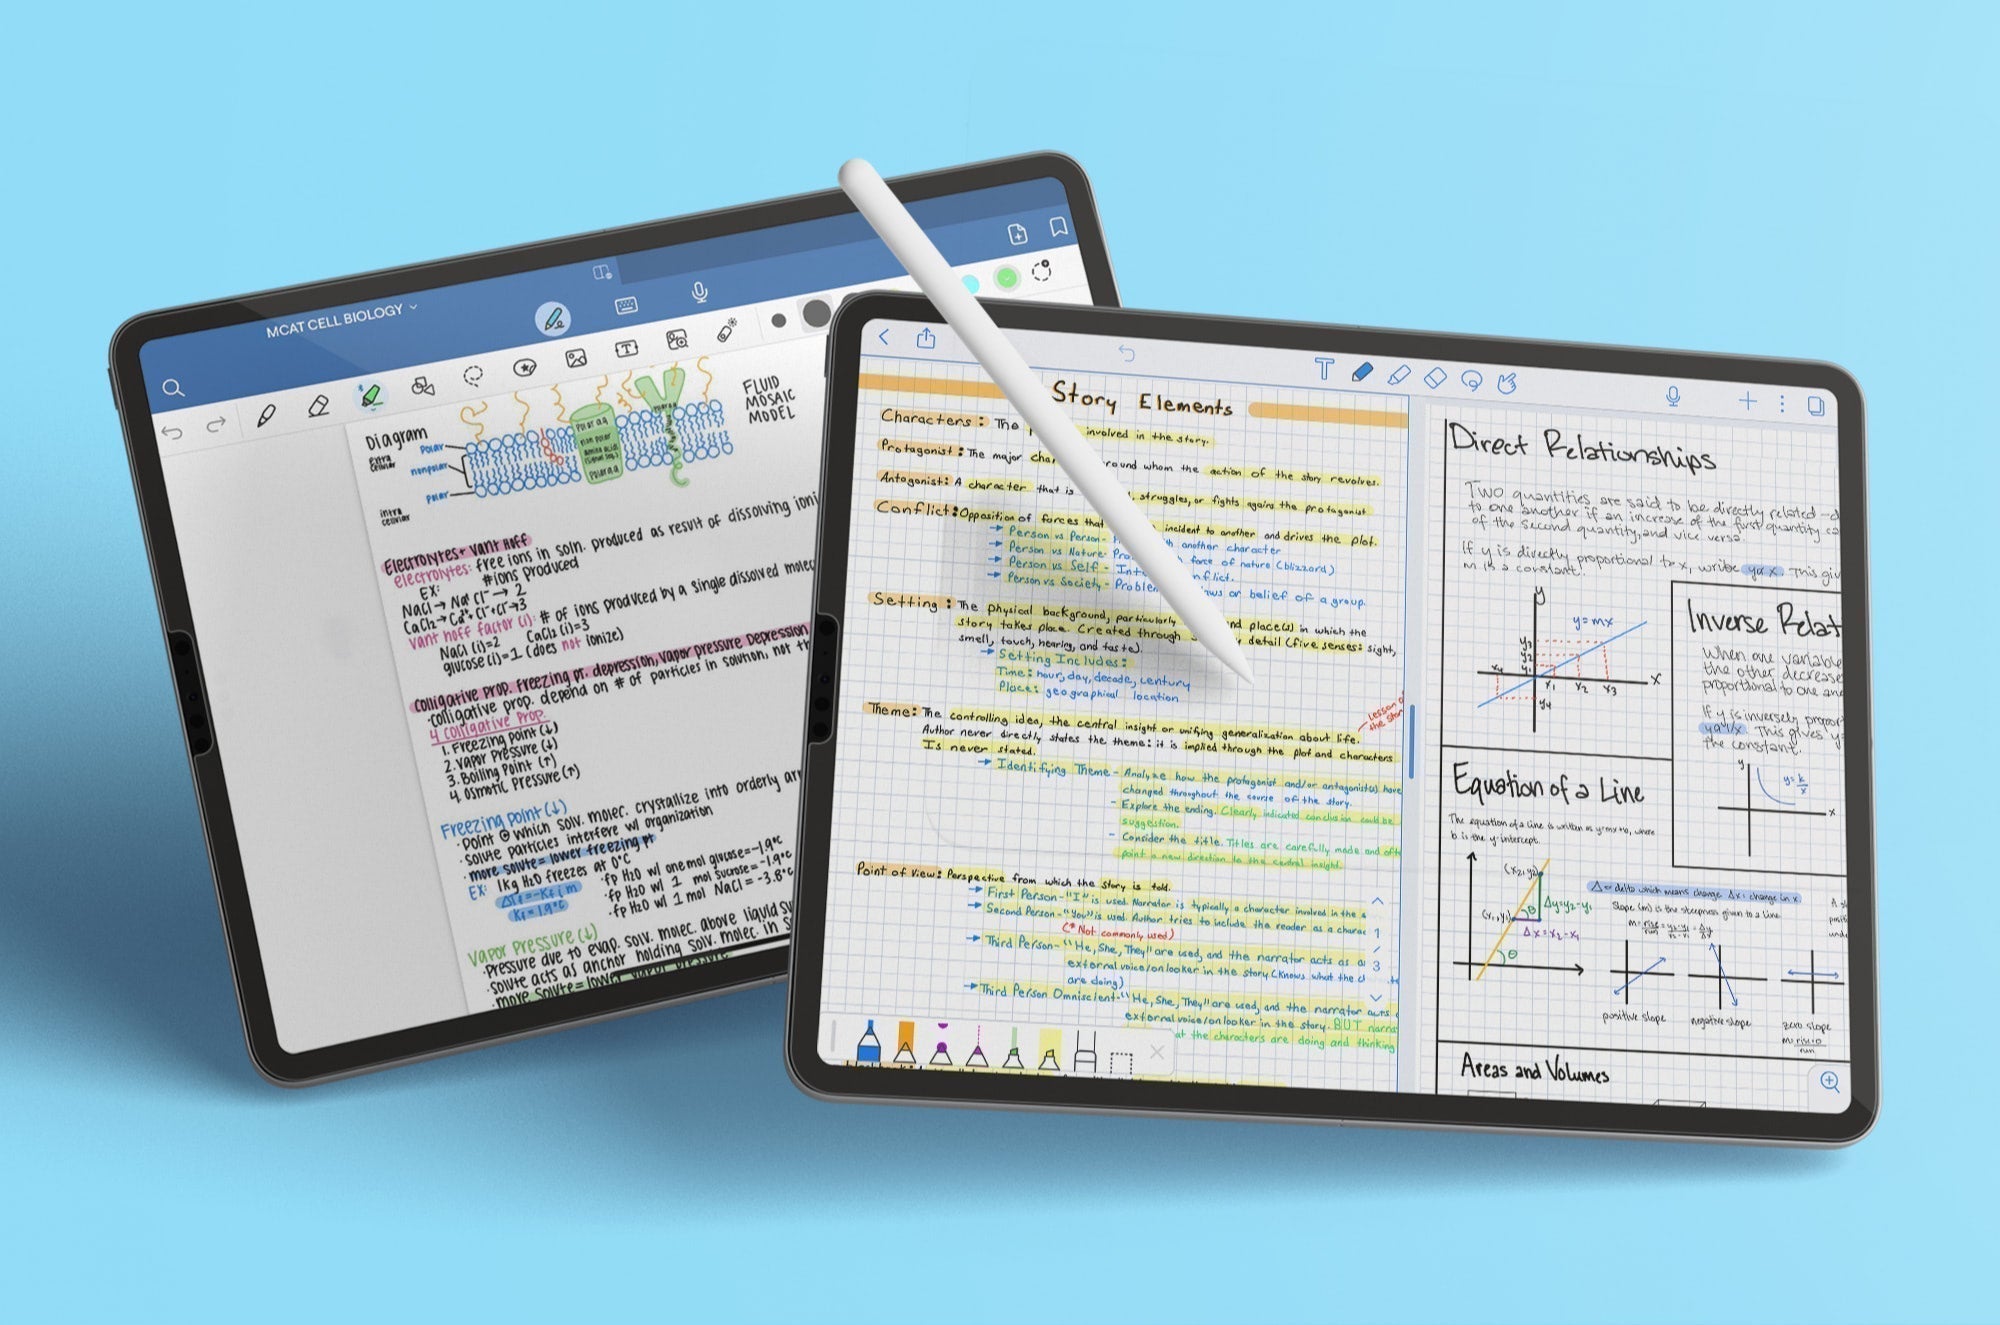
| Windowed Apps | Multiple apps share the screen and can be arranged side by side or layered. | Research, comparing documents, taking notes while watching something, or planning. |
| Stage Manager | Groups of apps organized into separate workspaces that you can switch between. | Managing multiple projects or workflows. |
Each one works in different situations, so it’s not like you’ll just pick one and stick with it all the time. You’ll want to switch between them based on what you’re doing.
Full Screen: When you need to focus
Full Screen is the default way most people use their iPad.
For a long time, it was the ONLY way you could use it. You open an app, it fills your screen, and that’s where you work. There are no overlapping windows, no floating panels, and nothing else competing for your attention.
That might sound basic, but that's kind of the point.
Full Screen removes everything that isn't directly related to what you're doing, so you can stay focused.

When to use Full Screen
Use Full Screen when you’re working on a single task in a single app.
Not every task benefits from having multiple apps open. In fact, depending on the apps, that’s a good way to get distracted. (I’m looking at you, NYT Crossplay.)
When you can see other windows, even in the background, your attention drifts. After all, you can’t just skip reading that email that just came in, can you? It might be important. Even if it only takes you a few seconds, it still breaks your flow.
Full Screen works because it removes that temptation entirely. With nothing else visible, it’s easier to stay focused and work through something.
Here’s when you’d want to use it:
- Deep writing - think notes, essays, blogs, or novels.
- Reading - working through PDFs (you can usually read and annotate within one note-taking app), textbooks, articles, or books.
- Drawing or sketching - whether for fun or work, it takes focus.
- Video editing - where screen space and precision matter.
How to set it up for focus
If you’ve never used Windowed Apps, your iPad is likely already set to Full Screen.
If it’s not, all you have to do is:
- Open Settings → Multitasking & Gestures.
- Choose Full Screen Apps.

That’s really it.
You can pair it with Focus mode to cut down on interruptions, too. To do that:
- Open Settings → Focus.
- Choose (or create) a Focus Mode.
- Limit notifications to only what you need.
You’re left with one screen, one task, and fewer reasons to look away.

Windowed Apps: When you need to work on multiple things
Windowed Apps is the new, hot multitasking system that Apple added with iPadOS 26.
Instead of one app taking up the whole screen, you can have multiple apps open at the same time. And you’re not limited to just two apps, either. You can have as many as you want. (Although it can get pretty cluttered, and I’m not sure why you’d need more than two or three...mayyybe four.)
You can also move, resize, and arrange them on the screen however you want.
Windowed Apps is all about working across multiple apps at the same time.
When to use Windowed Apps
Use Windowed Apps when you need to work on more than one app.
Not every task needs a single focused view. When you’re switching between apps, it’s easy to lose your place, and it’s harder to transfer information.
Windowed Apps works because it keeps everything in reach. You can glance left, grab what you need, and keep moving without breaking stride.
Instead of switching back and forth, you're just... working across things.
This is best for:
- Writing while referencing research – notes, articles, or sources on one side, your draft on the other.
- Planning – a digital planner alongside your calendar, or a task list next to your notes.
- Comparing documents – contracts, drafts, versions, anything where you need to see both at once.
- Watching while taking notes – lectures, tutorials, or meetings.
- Drawing with reference material – pull up what you're working from without leaving your canvas.
How to set it up for multitasking
If you’ve mostly used your iPad in Full Screen, Windowed Apps might feel new at first.
To get started, make sure multitasking is enabled:
- Open Settings → Multitasking & Gestures.
- Choose Windowed Apps.

Once that’s on, you can start adding apps to your screen:
- Open your first app.
- Swipe up slightly to reveal the dock.
- Drag another app onto the screen.
- Place it where you want it.

You can add as many apps as you want and drag them anywhere on the screen.
Also, when you open any of the apps in full screen, you can pull down from the top of the screen, tap Window → Move & Resize, and then choose from a bunch of different layouts.

Quick tips:
- Drag the edges of a window to resize it. (See that little black curve in the bottom right corner?)
- Move apps around depending on what you need to focus on. They’re not locked into wherever you put them. You can move them whenever you want.
- Use landscape mode when you need more space. (This is a must for me. I can’t work in portrait mode with Windowed Apps.)
Apple has a support page on its website and a YouTube video with instructions if you’re still confused.
Common ways to arrange your apps
There’s no single “right” layout, but there are a few that you’ll use more than others.
If you’ve used an iPad for a while, you might remember a feature called Split View. Apple used to treat it as its own mode, with two apps locked side by side. In iPadOS 26, that idea hasn’t gone away. It’s just been folded into Windowed Apps.
You can still place two apps next to each other and work between them like you could before (as shown at the beginning of the Windowed Apps section). You just have to position them manually or use Move & Resize and select halves (as shown in the image above). This works best when both apps matter equally, and you’re moving back and forth constantly.

You can also use Slide Over. This places one app in a floating window above another, so you can dip in and out without leaving what you're doing. It’s better suited for quick tasks, like checking messages or looking something up without breaking your flow. (But again, do you need to check right now? I’m not judging. Maybe you’re waiting for something important and relevant to what you’re doing.)
And if you need more flexibility, you’re not limited to those two setups; they’re just the ones that I, personally, find the most useful.
Switching between windows (Exposé)
Once you start working with multiple windows, finding the one you need can get a little messy.
Luckily, Apple thought of that. That's what Exposé is for.
Exposé shows all your open windows at once, so you can quickly jump to the one you’re looking for instead of digging through layers or rearranging your screen.
To use it:
- Swipe up and hold to open the App Switcher.
- Tap the app you want.
Exposé also works inside Stage Manager (see more below), where it becomes even more useful once you're juggling multiple workspaces.

Stage Manager: When you’re working across different projects
Stage Manager takes multitasking to a whole new level.
It lets you organize your apps into separate groups. Each group acts like its own workspace, with a set of apps that belong together.
You can then switch between those workspaces without having to rebuild your layout each time.
If you use Focus Modes, it’s a similar idea. Instead of filtering notifications, you’re filtering your workspace so your iPad only shows you the apps you need for that specific type of work.
If Windowed Apps feels like spreading everything out on one desk, Stage Manager feels more like having multiple desks you can move between.
When to use Stage Manager
Use Stage Manager when you’re switching between different types of work, not just working across multiple apps at once.
Some days, you're jumping between completely different contexts. Writing in the morning, handling emails, jumping on a call, then back to a project. Every time you switch, you end up rebuilding your layout from scratch.
When your workspaces are already set up and waiting, you stop wasting time on arrangement and just get back to work.
Stage Manager is great because, instead of a messy screen full of apps, each type of work has its own space.
You’d typically use it when:
- Managing multiple projects without everything bleeding together.
- Switching between focused work and communication throughout the day.
- Keeping different types of work in their own space, like a writing setup, a planning setup, or a communication setup.
- Any day where you're doing several different kinds of work, not just one thing with multiple apps.
How to create workspace groups
To use Stage Manager, you’ll turn it on the same way you do with the other modes:
- Open Settings → Multitasking & Gestures.
- Choose Stage Manager.

If you’ve already been working in Windowed Apps, whatever apps you’re currently working in will stay as you had them, but if you pull from the left side of the screen, you’ll also see a dock with any other apps you have running in the background.
From here, you can start building a group. Start with one app, then add others to it. To do that:
- Drag an app from the left-side list into the center of the screen.
- Or drag an app from the Dock into your current workspace.
- Arrange and resize the windows so they fit the way you want.
It’ll look something like this, but again, you can resize those windows:

For example, I have a writing setup for when I’m working on my novel. While I don’t typically use my iPad, this is what it looks like when I do:
- Notion - Holds my outline (not shown) and novel reference sheets (shown).
- Google Docs - This is where I write my first draft.
- Safari - Where I can reference the Save the Cat Beat Sheet. (This is just a popular story framework that makes it easier to outline.)
Take a look:

It’s important to note that there’s no formal way to create a group. You just drag apps together, and they automatically become one. When you switch away, iPadOS remembers that arrangement and saves it for you. When you come back to it later, everything will still be in place.
Take a look at the image at the beginning of the Stage Manager section to see what I mean.
To switch between groups:
- Tap another app or group from the left-side list.
- Or use the Exposé gesture and swipe up and hold to view all your open windows and groups.
You can also check out Apple’s support page for more information.
Taking it further: Using a second screen
You don’t need a second screen to use Stage Manager, but it can really expand your workspace.
Instead of fitting everything onto one small screen, you can expand it to two. In this kind of setup, your iPad is where you’re doing your work. The second screen holds whatever you want to see, but don’t necessarily need to do anything with.
This setup works especially well for:
- Writing with research – keep your draft on your iPad and reference material on the second screen.
- Drawing with references – use your iPad for your canvas and the larger display for inspiration or source images.
- Studying or planning – keep notes on one screen and supporting material on the other.
What I like best about this is that your iPad screen stays focused on what you’re actually doing, so you have room to work. As you can see in the image above, I don’t have much room to write in Google Docs when other apps take up part of the screen. Having a second monitor fixes that problem.
So... which one should you actually use?
At this point, that’s really up to you and what you’re doing. Each one solves a different problem, so the right choice usually comes down to how many things you need in front of you and how you want to work with them.
| If you’re doing... | Use this |
| Writing, reading, or focusing on one task. | Full Screen |
| Writing while referencing something. | Windowed Apps (side-by-side layout) |
| Comparing documents or taking notes during a lecture or video. | Windowed Apps (side-by-side layout) |
| Planning with multiple sources (planner + calendar, notes + tasks). | Windowed Apps (multi-window layout) |
| Checking messages or doing quick, in-and-out tasks. | Windowed Apps (Slide Over) |
| Managing multiple projects or switching between different types of work. | Stage Manager |
A good rule of thumb: if you're doing one type of work with multiple apps, Windowed Apps is probably enough. If you're switching between completely different contexts throughout the day, that's when Stage Manager really shines.
You don't need to commit to one setup. Most people end up moving between these depending on what they're working on.

Bringing it back to how it feels to work
As you start using these modes more intentionally, something changes. The iPad stops feeling like something that's nice to have and starts feeling like something you actually need.
And once the software side is working, the physical side starts to matter more, too. Most people don't notice when a setup feels right, but they sure notice when it doesn't.
The iPad's glass screen can make your Apple Pencil feel slippery and hard to control. The right resistance makes all the difference. The Paperlike Screen Protector adds a little friction where you need it, so writing and sketching feel natural.

FAQ
1. What happened to Split View?
Split View has been replaced by the new multitasking system, Windowed Apps. This sparked a lot of confusion among long-time iPad users, but you can still create a split view yourself within Windowed Apps.
2. What are the three multitasking modes in iPadOS 26?
The three options are Full Screen (a single app in full screen), Windowed Apps (resize and position windows freely), and Stage Manager (organize windows into groups/spaces).
3. How do I activate Windowed Apps or Stage Manager?
Go to Settings > Multitasking & Gestures, then select your preferred mode. You can also long-press the multitasking button in Control Center to swap between modes.
4. How do I resize windows?
Apps automatically open in full screen. Grab a corner of the window and drag it to the size and position you want on the screen. There's also a quick shortcut: double tap near the top of an app in full screen to make it a window. You can double tap again to change it back to full screen, too.
5. What are the Mac-style traffic light buttons?
These window controls work like Mac apps: red closes a window, green expands to full screen, and yellow collapses it to the dock. The button location has moved from top-center to top-left when you’re in a window. If you’re in full screen, pull down from the top to see them.
Final thoughts
The best multitasking mode isn’t the most advanced one. It’s the one that fits what you’re doing right now.
Some tasks need focus and nothing else. Others work better when you can see everything at once. And sometimes, it helps to separate your work into different spaces entirely.
Read next