


You know all those little things you do on your iPad every day?
Opening the same few apps. Checking your email, or the weather, or your calendar. Adjusting your brightness based on whether you’re indoors or outside.
It’s not hard, per se. But for a device that’s supposed to make things faster, it’s kind of weird how much tapping around it takes to get started. Don’t you think?
That’s where Apple Shortcuts comes in.
It’s a built-in automation tool that lets your iPad handle those repetitive steps for you. One tap, and it’s ready to go.
The problem is that when you open it, you see a bunch of options and blocks, which looks intimidating. I get it. I was the same way. But it’s not actually that complicated.
Here’s how to use it in ways that actually make your day easier.
A quick walkthrough
Shortcuts are exactly what they sound like. They let your iPad combine a bunch of actions into one tap.
Don’t confuse this with automation. An automation does the same thing, but it runs on its own. Think: at a certain time, when you arrive somewhere, etc.
We’re sticking with Shortcuts in this guide because they’re easier to control and way less intimidating.

To start, open the Shortcuts app. You’ll land on the All Shortcuts screen, which, of course, holds all the shortcuts you’ve created.
(The Shortcuts app comes preinstalled on the iPad, but if you have an older model running iPadOS 12 or later, or just don’t see it, you can always download it from the App Store.)

Every shortcut is made up of small steps called actions. To create one, you’ll:
- Tap the + button.
- Add actions (like “Open App” or “Play Music”).
- Arrange them in the order you want.
- Name the shortcut at the top left.
- Tap the share icon.
- Select Add to Home Screen.
That’s all there is to it. Now you have a shortcut!
| Quick tip | If you tap the Gallery tab at the top left, you’ll find Apple’s collection of pre-built shortcuts. Take a look to see if any can already do what you need. |
Let’s build a few you’ll actually use.

Morning Dashboard
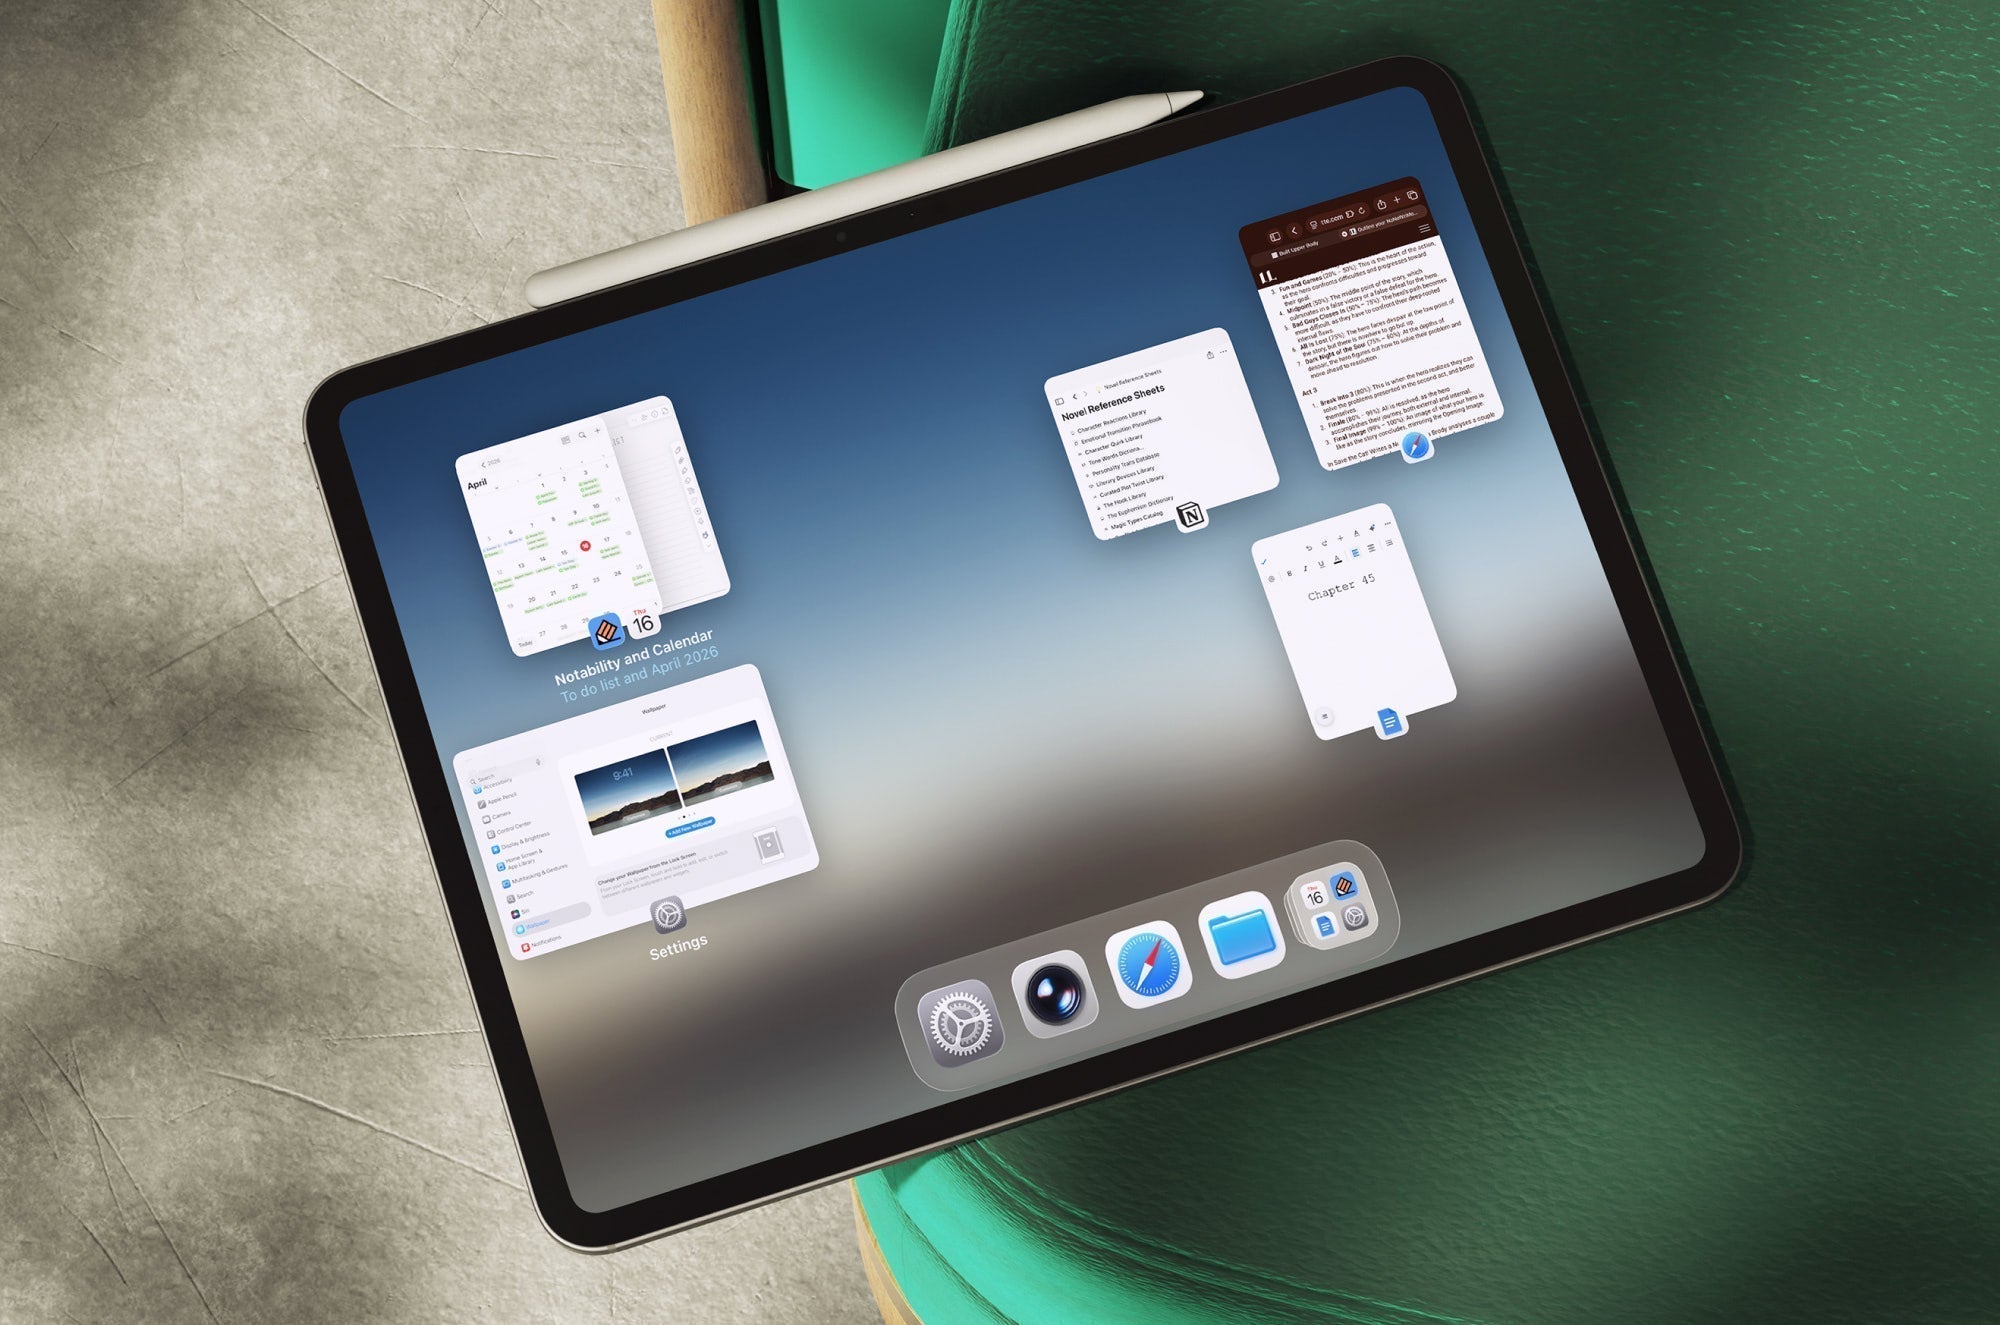
I like to start my day with a coffee and my Morning Dashboard. This shortcut shows me the weather, my calendar events for the day, and a motivational quote to get me going.
How to set it up
- Open the Shortcuts app.
- Tap the + in the top right corner.
- Name it Morning Dashboard.
Add the weather
- Search for Weather.
- Tap Show Weather.
- Tap the blue section to add a location. (I use My Location and allow access for that.)
This will display the weather when you run the shortcut.

Add your motivational quote
There are a few ways you can do this, depending on where you get your motivational quotes. I have the Daily Affirmations & Quotes app, so I’m going to show you that, but the process will be the same for any app you choose.
- Select Open App.
- In the blue section, choose your app. (For whatever reason, the name of my app changes to Quotes & Sayings here. Not sure why.)
- Tap the blue arrow and choose the Window Location & Size.
This should pull up your motivation quote in the app when you hit your shortcut button.
| Quick note | I originally placed this at the end, but that forced me to close out of my calendar view before I could see it. Moving it above the calendar step made the flow a lot smoother. |

Add your calendar events
- Search for Calendar.
- Select Find Calendar Events.
- It should say Start Date, tap whatever is in blue next to it, and change it to is today.
You can also add other filters based on your needs, but that works well enough for me.

You’ll still need to add one more action to show the events.
- Search and select Show Alert.
- Tap on the blue text and choose Calendar Events.
- Check Title (so it shows you the name of the event).
(For some reason, it has ‘Do you want to continue?’ written in blue. I just deleted that.)
Now you’ve got your events.

Once you’ve added all three sections, run the shortcut to make sure everything flows in the right order. You can see what that looks like in the image at the top of this section. Then add it to your Home Screen so it’s ready to go every morning.

Digital Planning
The next shortcut helps you plan out your day. It includes your planner, your calendar, and Focus. In this example, I’m going to show you the way I do it, but you can use whatever apps or tools you prefer.
How to set it up
- Open the Shortcuts app.
- Tap the + in the top right corner.
- Name it Digital Planning.
Add your planner
I use the digital Paperlike Pro Planner in Goodnotes, but you can use any note-taking app or planner you prefer. The steps will be mostly the same.
The only difference is that if the app you'd like to use doesn’t have the options (like I’m going to show you), you’re stuck with Open App. That’s fine, but it means you won’t be able to go straight to your planner. You’ll have to open that once you’re in the app.
- Search Goodnotes.
- Select Open Document.
- Select your planner from the menu.
The cool thing about using Goodnotes for this is that it automatically opens your planner to the exact spot where you were last working.

Add your calendar
- Add Open App.
- Tap the blue box and select Calendar.
- Tap the blue arrow to set your Window Location & Size.
This gives you a quick visual of your plans. (Note: You should have the hang of this by now, so I’m not including an image for this step.)
Add your Focus settings
- Search for Focus.
- Select Set Focus.
- Choose the Focus mod you want (I use Do Not Disturb).
- Set it to Turn On.

You can change the ‘until’ setting to whatever you prefer. Again, this is all about making your own life easier. I have mine set to Turned Off because I never know how long a planning session will take me.
Focus will keep notifications from pulling you out of your planning.
Just like with the last shortcut, make sure to test it out and then add it to your Home Screen. (You can see what it looks like in the image at the top of this section.)

Get Things Done
If you have trouble sitting down and getting to work, this shortcut might be the one for you.
It opens your task list, sets Focus Mode, and starts a Pomodoro tomorrow, so you can get straight to work.
How to set it up
- Open the Shortcuts app.
- Tap the + in the top right corner.
- Name it Get Things Done.
Add your task list
This step will be different depending on how you set up your tasks. You can add your digital planner (like we’ve done above) if you like to use your handwritten task list, or you can add a task app.
I like to use Todoist, which has built-in shortcut options. Other task apps may as well, so you’ll need to check for those. If it doesn’t, you can always use Open App.
- Search for Todoist.
- Select Open View.
- Tap the blue text and choose Today.
This opens your task list, so you know what to start working on first.

Add your Focus settings
This will be the same process as the previous shortcut, so you can go back and look at that image.
- Search for Focus.
- Select Set Focus.
- Choose the Focus mode you want (I use Do Not Disturb).
- Set it to Turn On.
- Change the ‘until’ to whatever you prefer (I use I Leave for this one).
Add your Pomodoro timer
As with most of the examples, there are plenty of available apps for the Pomodoro technique that you can use for this. Some may have built-in features, but you can also use Open App if needed. I just use the Clock timer because it’s already available.
- Search for Timer.
- Select Start Timer.
- Tap the blue text (it’ll say Duration minutes).
- Change it to 25 minutes.
Down at the bottom, there will be other variables. Don’t use any of them. When you’re done, it should just read “Start 25-minute timer.” It shouldn’t say “Ask Each Time” or anything dynamic because you want this to be automatic.

You can play with the order, but I’ve found this one works the best for me. Test it out and see what you like. It should look something like the image at the beginning of this seciton when you’re done.
Another option is to add whatever app you need to start working on your task list, but since that can vary day to day, I don’t do that. I just check my list and then open whatever I need to each day.
P.S. Don’t forget to add the shortcut to your Home Screen!

Scan & File
This is the shortcut for the paper that somehow still shows up in your life. Whether that’s forms, receipts, class handouts, or random documents you swear you’ll file later and then don’t.
Scan & File lets you scan a document, name it, and save it to the right folder in one flow.
How to set it up
This shortcut takes a few extra steps before you can get started. You’ll need to download the Actions app from the App Store first (This is full of different Actions that you might find useful for your future Shortcuts). Then follow the rest of the directions below.
- Open the Shortcuts app.
- Tap the + in the top right corner.
- Name it Scan & File.
Add scan
The first thing you need to do is add your scanner.
- Search for Scan Documents.
- Make sure to select the Scan Documents with the Actions app icon in front of it.
- Keep Use PDF toggled off. (This is important for later because it messes things up if you have it on.)
This will open the camera, so you can take a picture of your document.

Add rename the file
This is where things get a little complicated, because you’ll need to add a bunch of actions.
- Search for & add Wait to Return.
- Search for & add Get Clipboard.
- Search for & add Get images from Input.
- Change the blue text to Clipboard (mine did it automatically).
- Search for & add Make PDF.
- Change the blue text to Images (mine did it automatically).
- Search for & add Set Name.
- Change the blue text that says Input to PDF (mine did it automatically).
- Change the blue text that says Name to Ask Each Time.
It seems like a lot of steps, but once they’re set, everything runs smoothly.

Add save your file
In comparison, this step is easy.
- Search for & add Save File.
- Change the blue text to Renamed File (mine did it automatically).
- Using the blue arrow, toggle on Ask Where to Save.
This will allow you to choose the folder where you’d like to save your documents. But, if you want to always save to a specific folder, you can toggle off Ask Where to Save, and then:
- It will now say ‘to’ with blue text.
- Change the blue text to the specific folder where you want to save your scanned documents.
This is handy if you want to create separate shortcuts for different file types. For example, you could duplicate this shortcut and name it Receipts. Then you could use it to scan and save all your receipts to a specific folder.

This shortcut is one of my favorites because it has so many uses. Save all your class handouts in one place, all your receipts, or whatever else you may need. Or you can just leave the Ask Where to Save on, and choose the folder you want each time, instead of creating a shortcut for each type of scan.

Share to Socials
If you’re a content creator, influencer, or just love using social media, this shortcut is for you. This is what you’ll use when you have a photo you want to post that isn’t in the right format.
Instead of resizing, exporting, and then hunting for the app, this shortcut preps your image and sends it straight to where you want to share it.
How to set it up
- Open the Shortcuts app.
- Tap the + in the top right corner.
- Name it Share to Socials.
Add your image
- Search for Photos.
- Select Select Photos.
- Turn OFF Select Multiple (unless you want batch posting).
This will prompt you to choose the photo you want each time you run the shortcut.

Add resize image
- Search for & add Resize Image.
- Tap the blue text to set a size.
On most social media platforms, a width of 1080 keeps things sharp without being too big. Leave the height set to auto to keep the correct proportions.
You may also want to convert the format to a JPEG.
- Add Convert Image.
- Set it to JPEG.
Check your platforms to see what format they prefer or works best.

Add share
- Search for Instagram (or whatever social you use).
- Select Post on Instagram.
- Tap the blue arrow and add Ask Each Time to the Caption. (You can skip this and do it in the app, if you prefer.)
From there, you can choose whether you want to create a story, add the image to your feed, or send it as a message.

Take a look at the image at the beginning of this shortcut to see how things will look when you get to Instagram. (And yes, I did take that photo of the adorable sloth. Unfortunately, they wouldn’t let me pet it, though.)
| Quick tip | Make sure that you’re already logged in to your social accounts, or this won’t work. |
As with all the rest, give it a test run before saving it to your Home Screen.

Creative Flow
Whether you’re a professional or a hobbyist, this one is for all the digital artists out there.
It’ll open up your drawing app and pull up your reference image or inspiration board.
How to set it up
- Open the Shortcuts app.
- Tap the + in the top right corner.
- Name it Creative Flow.
Add your drawing app
Our resident artist, Alanna, uses Procreate, so that’s what I’ll be including today.
- Add Open App.
- In the blue text, choose your app (I chose Procreate).
- Use the blue arrow to designate the Window Location & Size (I used Left).
For me, that opens up Procreate on the left half of the screen.

Add your reference image
This one is a little trickier because there are so many ways to do this. For this example, I’m going to open a Pinterest board with images to use as inspiration.
- Search for & add URL.
- In the blue box, copy/paste the link to your Pinterest board. (Yes, yes, I am linking to a crochet board. I, alas, don’t have the digital art talent of our arts writer Alanna Flowers.)
- Add Open URL.

You could also choose to use Open App to open the Pinterest app, but that won’t take you to a specific board. If you have a bunch of different boards, and you need to pick between them each time, that might make more sense for you.
I’m sure there are plenty of other things you could add to this shortcut, as well. Maybe open the folder where you want to save your work or something along those lines. Take this shortcut and make it your own.

End-of-Day Reset
This is the shortcut that you run before you go to bed and shut everything down for the day.
It helps you reflect on what you got done, look ahead to tomorrow, and set yourself up so you’re not starting from scratch in the morning.
How to set it up
- Open the Shortcuts app.
- Tap the + in the top right corner.
- Name it End-of-Day Reset.
Add your reflection prompts
You can do this in a few different ways. If you already have a digital journal, you can pull that up. If you have a daily reflection page in your planner, that would also work. I typically use my planner, but for this shortcut, I’m going to show you another option, in case you don’t have a journal or planner to work with.
- Search for & add Ask for Input.
- Enter your first question in the Prompt, for example:
- What did I finish today?
- Leave the input as Text.
- Repeat this step for whatever prompts you want.
This will walk you through each question when you run the shortcut.

You’ll probably want to save those (I’m assuming here, but it makes sense.). To do that:
- Search for & add Text.
This will give you a text box, which you’ll then format, like this:
- Select Variable - Current Date.
- Type End-of-Day Reset.
- Type Finished.
- Tap the space beneath, tap Select Variable, and choose the Ask for Input from the corresponding question.
- Type Still needs attention.
- Tap the space beneath, tap Select Variable, and choose the Ask for Input from the corresponding question.
- Type Tomorrow.
- Tap the space beneath, tap Select Variable, and choose the Ask for Input from the corresponding question.
It should look like the picture below when you’ve finished.

To save it, you’ll still need a few more steps.
- Add Append to Note.
- Tap the note field.
- Choose: An existing note (like “Daily Reset”).
- You’ll need to create the note in Apple Notes ahead of time.
Now it’ll add a new entry when you run the shortcut, which creates a running log you can come back to later.
I’m sure there are ways to add this to a different note-taking app if you prefer, but I think it’s easiest to just use Apple Notes.

Okay, now you have your reference prompts, and it’s time to open your planner.
Add your planner
You’ll do this the same way as you did for the Digital Planning shortcut, so I’ll list the steps, but you can go back to that section to reference the image.
- Search Goodnotes.
- Select Open Document.
- Select your planner from the menu.
Now you can move the tasks you set for tomorrow over to your planner.
If you don’t already have an alarm set for the morning, you can also add that to your shortcut.
Add your alarm
- Search for Clock.
- Select Create Alarm or Toggle Alarm.
- Set your preferred time.
This is a nice way to fully close out your day, so that you’re ready to go in the morning.

Bonus: Apple Pencil Pro Quick Actions
If you’re using an Apple Pencil Pro, you’ve already got a built-in shortcut. Well, sort of.
It’s not a Shortcuts automation, but the squeeze gesture works the same way. It lets you trigger certain actions without tapping your screen, which helps you stay in your flow.
How to set it up
- Open Settings on your iPad.
- Tap Apple Pencil.
- Find the Squeeze settings.
- Choose what you want the gesture to do.
Depending on the app and what you’re trying to do, this could be:
- Switch between pen and eraser.
- Open a tool palette.
- Adjust brush settings.
This is just a cool little extra that could make a big difference if you know how to use it.

Final thoughts
It may feel like a lot, but just start with one and play with it until it feels right. Once you’ve got it set up and working the way you like, you’ll be amazed at how much time it saves you.
Then you’ll want to build more. The good news is you can check out the Gallery in the app. There are tons in there already that you might be able to use or just give a little tweak to make it work for you.
When you’ve got shortcuts working for you, using the iPad feels more natural. That’s the whole idea behind Paperlike, too: less friction, more flow.
Frequently Asked Questions
What are iPad Shortcuts, exactly?
Shortcuts are automations that let your iPad handle multi-step tasks for you in one tap. Instead of manually opening apps and switching settings, a shortcut runs everything in the background.
What’s the difference between a shortcut and an automation?
A shortcut runs when you trigger it, like tapping an icon or using Siri.
An automation runs on its own based on a trigger, like a time of day or location.
If you’re new to this, start with shortcuts. They’re much easier to control.
Do I need coding or technical skills to use Shortcuts?
No. The Shortcuts app uses a drag-and-drop system, so you’re just stacking actions in order. If you can follow a few steps, you can build one.
Where do I find pre-made shortcuts?
Inside the Shortcuts app, check out the Gallery for ready-to-use options. You can also find shared shortcuts online and tweak them to fit your workflow.
Can I use Shortcuts with my note-taking apps?
Yes. Apps like Goodnotes and Notability support different shortcut actions.
You can do things like open a specific notebook, create a new note, or organize files faster.
What’s the easiest shortcut to start with?
Start with something simple, like a Focus or Study Session shortcut. It only takes a few steps to set up, and you’ll notice the difference right away.
Once you’ve built one, the rest feel a lot less intimidating.