


Right now, digital notetakers are spoiled for choice when choosing the best app to use for notetaking.
But, if you’re an Apple user, the perfect notetaking app might already be sitting on your iPad.
We’re talking about Apple Notes!
The app comes preinstalled on all Apple devices, making it easily accessible for modern notetakers.
This app has come a long way since it first launched with iOS 1.0. The current version comes equipped with a variety of tools to help you write, store, and share your notes.
So how does this app measure up against other major notetaking apps in the App Store? Is it ready for serious notetakers?
Let’s find out!
Key Takeaways
- Apple Notes is free and built into the iOS.
- Easy to collaborate using shared notes and folders.
- Open a Quick Note from anywhere on your iPhone or iPad.
- Provides a realistic writing and drawing experience with the Apple Pencil.
Specs, tech, & costs
Because Apple Notes is an Apple product and part of its native operating systems, it’s not surprising that it’s only available on iOS and macOS devices.
The good news is that it’s completely free, and there aren’t even any in-app purchases with upgrades. You’ll have access to every feature of the app, as long as you have an iPhone, iPad, or Mac to use.
Since Apple Notes is built into the operating system of these devices, you'll automatically get the latest updates to the app included in any iOS or macOS update.
You can even create notes from a PC by logging into iCloud.com and clicking on the Notes section.
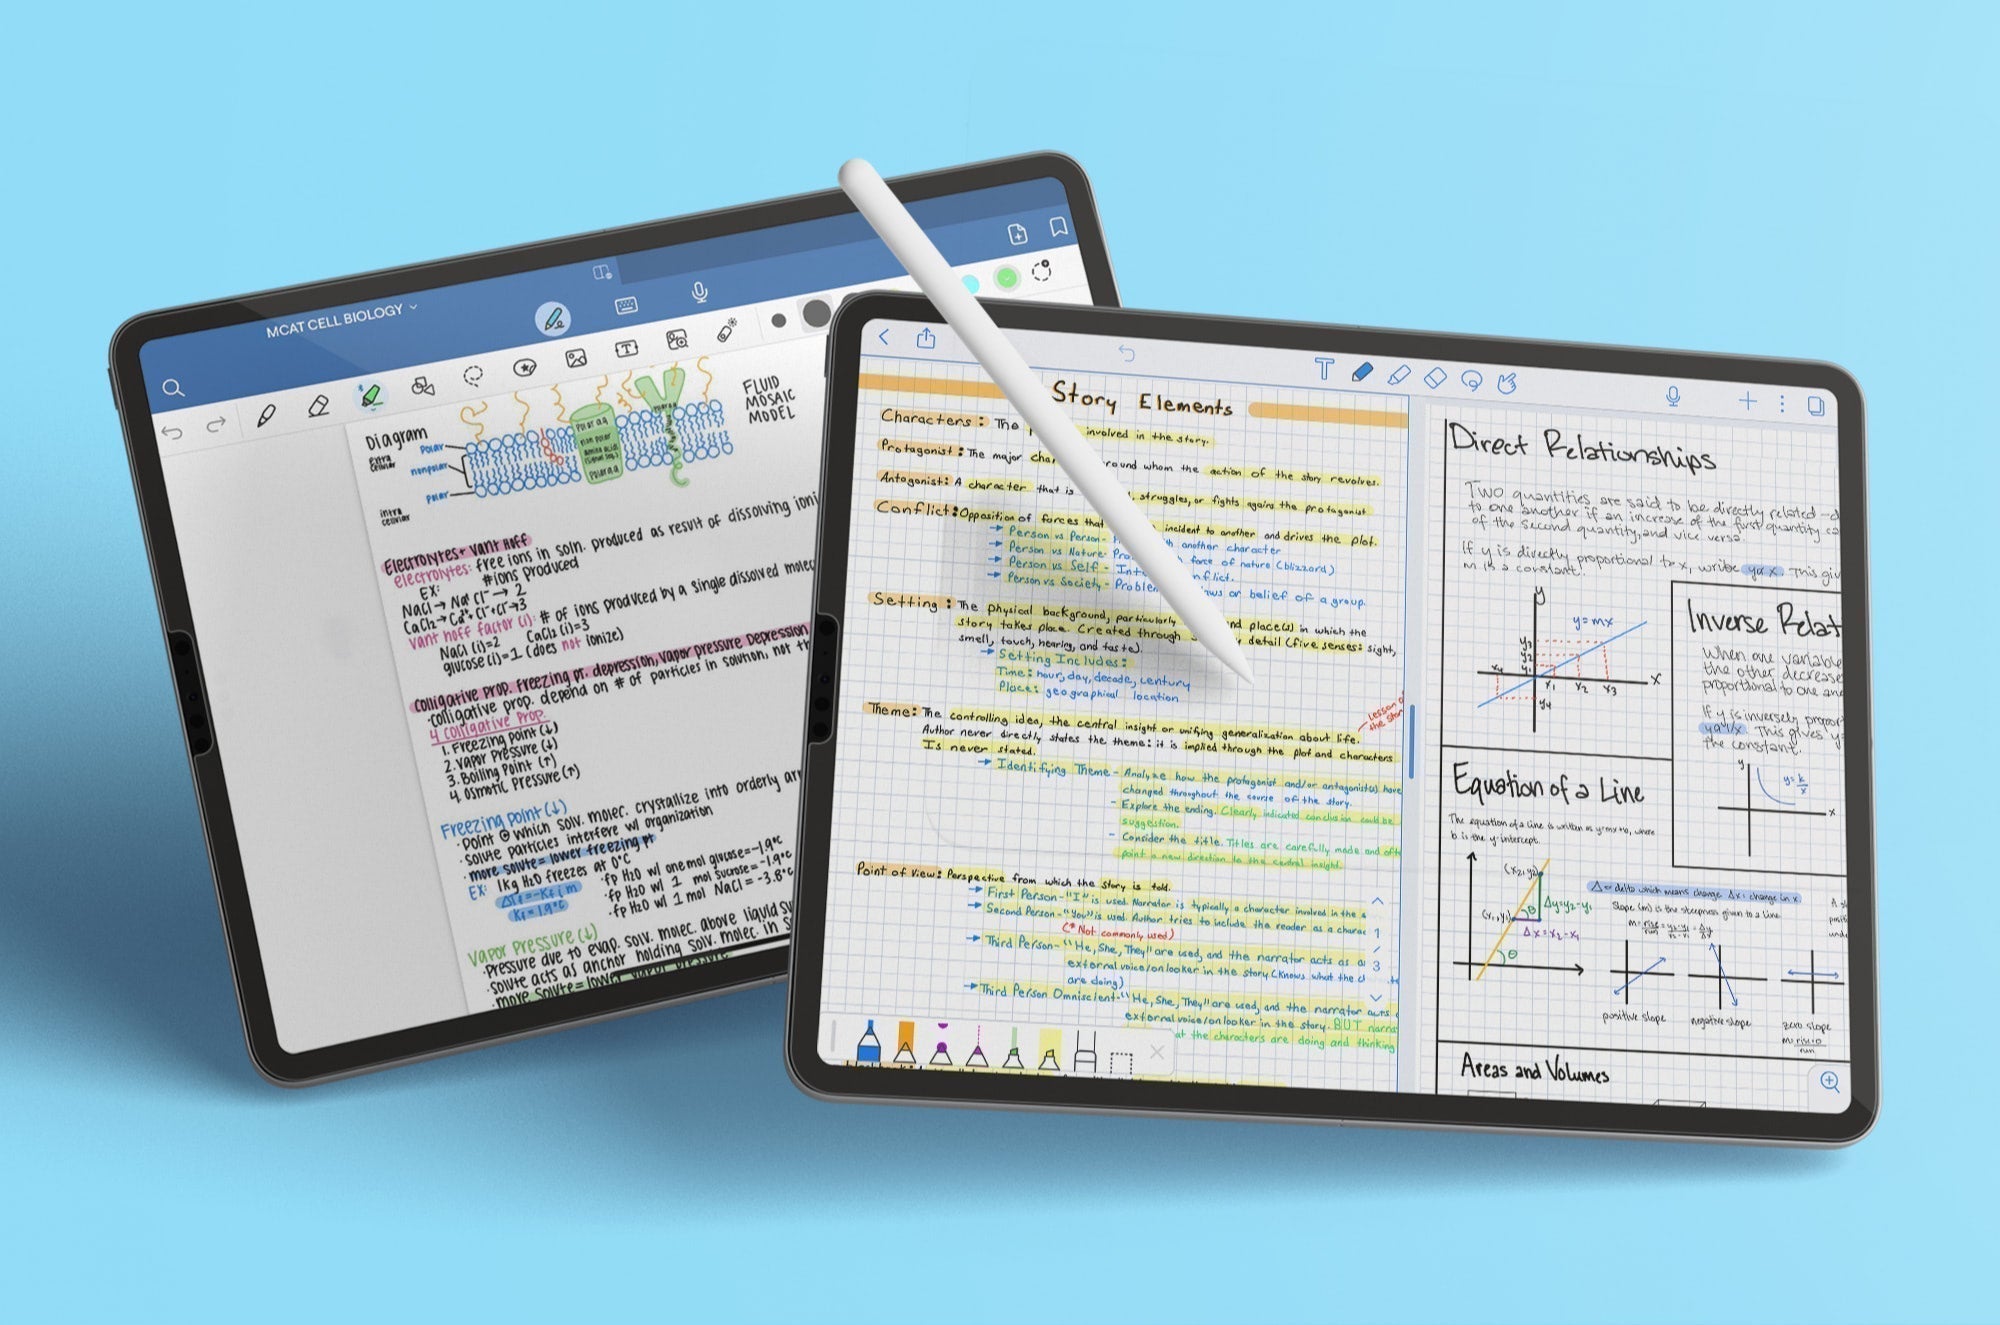
If you love taking handwritten notes, the best setup will be an iPad and the Apple Pencil. Everything that Apple makes integrates well and is designed to work together, offering the best setup for taking notes.

Apple Notes: The basics
The latest updates have turned Apple Notes into a strong contender for digital notetakers.
Improved organization, advanced search capabilities, functional tools, and the ability to scan documents are just a few of the new features Apple has added in recent years to make Notes a more powerful app.
Let’s take a look.
Organization
For serious notetakers, organization is key. Apple Notes makes this process simple and has integrated new systems that make it easy to find what you’re looking for when you need it.

Folders
Like most notetaking apps, Apple Notes uses a folder system to keep things organized.
Apple Notes has two different types of folders:
Regular Folders are your basic folders. You can use them to organize your notes however you’d like. You can even move notes from one folder to another easily.
Smart Folders are a cool feature you’ll really only find in Apple Notes. When you create a new smart folder, you’ll select hashtags to associate with the folder's category. When you tag your notes, they will be automatically sorted into the associated smart folder. You can also add filters to your smart folders for even better organization.
You can create as many folders as you want by tapping the New Folder button in the bottom left-hand corner of the app. You can also nest subfolders up to five levels deep to keep things in order.
On top of the folders you can create, Notes already comes equipped with a few default folders.
The Notes folder under both the iCloud and On My iPad tab is a catch-all for unsorted notes, while the All iCloud or All on My iPad folder lets you access any note currently in either of these locations.
The Quick Notes folder is created specifically to store Quick Notes created on your lock screen or in applications outside of Apple Notes.
The Shared folder includes any notes you’ve shared with others or notes that others have shared with you. These allow for collaboration (more on this below).
When you discard a note, it is moved to the Recently Deleted folder, where it can be recovered for up to 30 days before being permanently deleted.

Sorting / navigation
By default, Apple Notes automatically sorts your existing notes by last edited, and it goes even further by grouping your notes by dates, such as Today, Previous 7 Days, and so on. However, you can change this by selecting Sort Notes By to find a few more options.
Apple Notes has advanced search capabilities, such as built-in optical character recognition (OCR), that will quickly scan all your notes when you type something into the search bar. OCR can locate your search terms in text, handwritten notes, images, and scanned documents.
The best part: You don’t have to manually search through all your notes when you need to locate something. If you’re looking for something specific, you can even narrow your search to specific notes for better results.
You also have access to other tools to make navigation easy. You can pin important notes to the top of a folder for easy access. You can also tag notes with hashtags for faster sorting (requires iOS 14 or later or macOS Big Sur).
Views
Another easy way to navigate in Apple Notes is by using the different types of views available.

List View
When you’re in List View, your notes will appear in a list with the title and the first few words of your note.
Apple Notes defaults to List View, which divides Notes into three navigation windows: folders, notes, and content.
However, this view changes based on whether you hold your device vertically or horizontally while working in Notes.
If you’re holding the iPad vertically, these menus will appear over the top of the note that you’re working with. If the iPad is turned on its side, the menu will automatically position itself on the left side of the screen for faster accessibility and navigation.
List View is ideal when you need to keep track of multiple topics at once because you’ll see more notes on your screen. For users who like a compact workspace, List View lets you pack as much onto the screen as possible.
But keep in mind that making sense of List View requires better structure and organization for your notes because there isn’t as much to see when searching from the main screen.

Gallery View
When you’re working in a folder, you can tap the ellipsis and select View as Gallery.
Gallery View will show a thumbnail of each note. The thumbnail will show either part of the text or the top photo associated with the note (if you’ve attached images to your notes).
Compared to List View, this view is more comfortable and offers a greater selection of customization options. By tapping the ellipsis button on the far right, you’ll have the option to increase or decrease the size of each note thumbnail.
If you’re a more visual person, this view allows you to quickly see what’s in each note, especially if you’ve attached a picture or document.
Protip: Regardless of which view you use, you can get a closer look at any note by pressing and holding it. When you do this, the note will enlarge so you can take a better look at its content.
Tools
While the Apple Notes toolbar might seem small when compared to other notetaking apps, it offers more than enough functionality to get the job done.
Here’s a quick overview of the tools and how you can use them to improve your notetaking experience.
Text
Typing with either the on-screen keyboard or an external keyboard like the Magic Keyboard for iPad is one of two ways to add notes to Apple Notes.
To have the best experience here, you'll want to turn on keyboard shortcuts, located under General > Keyboard > Keyboards.
Once you do that, you'll be able to use the shortcut menu to change the style and formatting of your text. This also causes a little menu to pop up when using your external keyboard.
While you can’t change the font size or the spacing, you can create a title heading or style your font using bold, italics, underline, and strikethrough for emphasis. You can also choose from five colors if you want something other than black.

If you’re a big fan of typed text, Apple Notes also comes with onboard handwriting conversion via the Scribble feature. With Scribble enabled, Apple Notes will automatically convert handwritten notes created with your Apple Pencil to text.
You can also disable Scribble in the Settings menu, which is useful if you want to combine handwritten and typed text inside a single document. However, unlike apps such as MyScript Notes (Formerly Nebo), Notes keeps the text and handwritten sections in separate blocks on the page, so intermingling the two is somewhat limited.
Pen / Pencil
Whether you’re taking notes or drawing (or sketchnoting!), you’ve got plenty of options. You can use your finger or a stylus/Apple Pencil to write with these tools.
If you’ve gotten the latest updates, you will have four different types of pens, a pencil, and a marker.
- Monoline pen. This pen offers the same, consistent thickness in every stroke.
- Fountain pen. Perfect for calligraphy and gives handwriting a more elegant look.
- Watercolor pen. Mimics a watercolor brush for those looking for a more artistic touch.
- Ballpoint. Only available if you have Scribble enabled, but it’s designed as a convert-to-text pen and doesn’t allow you to write freely.
The Pencil, Marker, and Crayon tools are exactly what you would expect from their names.
All of these tools (except Ballpoint) have five preset line thicknesses and an opacity slider, which allows you to choose how dark or light the tool will write. They also have a color selector on the far right with a few default options, but you can use the color grid to select any color variation that you need.

Though similar in features, it’s worth remembering that the Pen and Pencil are two separate tools. The lines created by the Pencil look grainy compared to pen strokes, and this is by design.
The Pencil tool excels when combined with an Apple Pencil for drawing and sketching. It’s easy to shade or darken a line by tilting your Pencil or adding pressure. The Pencil tool responds to pressure sensitivity, has no lag, and offers a realistic drawing or writing experience.
Apple Notes also has Smart Script, which can refine your handwriting, correct spelling and grammar, and convert typed text to look like handwriting.
Keep in mind that writing and sketching on a digital notetaking app can be challenging due to the glass screen.
While Apple Notes does its best to offset this challenge, a Paperlike Screen Protector can make the surface of your iPad feel like real paper, immensely improving your experience.
Eraser
When you make a mistake, you’ll need the Eraser tool to correct your note. Apple Notes offers two different eraser modes for added convenience.
When you hold down the eraser icon, you’ll be able to choose between the Pixel Eraser and an Object Eraser.
The Pixel Eraser is the regular eraser that works just like one on a real pencil. There are five preset sizes; however, if you’re using an Apple Pencil, you can also adjust the eraser size by tilting it.
The Object Eraser allows you to press on an object to erase larger chunks at a time, rather than moving the eraser tool over every part of it. If you need to erase something large, this tool is faster than using the regular pixel eraser.
Highlighter
The Highlighter tool is used to highlight specific sections of your note, providing emphasis or drawing the focus to this part of the text.

Like the Pen and the Pencil tools, the Highlighter comes with five preset thicknesses and an opacity slider. The nice thing is that even at 100% opacity, it won't dim your notes.
The default color is yellow, but again, you can use the color selector on the right to change it to any color you’d like.
One kind of weird thing is that the presets are really large. The #1 is really the only one that seems usable, and it’s just a tad too thin for me. But that could just be my personal preference, so you might find #2 to be the right fit.
Extras
You’ll also see a few extra tools on your toolbar, including the Lasso tool, the Ruler, and the Color Palette.
The Lasso tool allows you to move content around on the page. To use it, just outline the content you want to move, then press on the area and drag it to its new position. Unlike some of the other notetaking apps, Notes doesn’t allow you to resize or rotate your selection.
But you can use this tool to straighten your handwritten text, which is pretty neat if your handwriting tends to slant or wander on the page.
As you move your drawn selections, keep a close eye on the little tab marker on the left side of the document (pictured below). The marker indicates where your drawn elements begin. This is critical if you’re trying to add text and hand-drawn objects to the same document.

The Ruler tool can come in handy if you need to draw a straight line. You can adjust the Ruler’s placement and angle and draw a straight line along the edge. The Ruler also has measurements, so you can get the exact length that you need.
The Color Palette allows you to change the color of your writing or drawing tool. Black, blue, green, yellow, and red are default, but you can use the palette to create custom colors, too.
The Apple Toolkit also has a Text tool and a Shapes tool on the toolbar, allowing you to easily add text, a signature, or preset shapes into your notes.
While not located in the toolkit, Apple Notes also allows you to record audio, and it offers real-time transcription. It may not be as fancy as what you’ll find in Goodnotes and Notability, but it’s still a great tool to have.
Note creation
It’s a quick and easy process to create notes, no matter where you are in the Apple Notes app. Just hit the New Note button (square with a pencil going through the upper right corner), and a blank note will automatically fill your screen.
From here, you can hit the More button (three dots) to customize your workspace. While Notes doesn’t really include any templates, you can choose from different background layouts in the Lines & Grids menu or tap Customize Toolbar to rearrange or delete items from your top toolbar.
You can format your text, add lists or tables, record audio, and import photos or documents (more on this below) by clicking the appropriate icon on your toolbar.
And that’s about it. There may not be as many customization options for your notes as you’d find in other notetaking apps, but Apple occasionally adds new ones, so it’s likely that the app will continue to add more customization features in the future to streamline your workflow.
Importing / scanning
Apple Notes does let you attach PDFs to your notes. Unfortunately, it can still be a little tricky, as it’s not as easy as importing your document.
Instead, you have two choices: drag and drop the PDF from the Files or Mail app, or use the paperclip icon and tap on Attach File.
Even once the PDF is in your notes, viewing and annotating it aren’t very intuitive. This is because it still acts more like an attachment than a part of your notes.
To view or annotate your PDF, you’ll need to tap to open the document. Once you’ve done that, tap the pen icon to access your Markup tools for annotation.
This isn’t terribly different from how Apple Notes handles images or scanned documents. The camera icon allows you to scan a document, take a photo, or upload a photo to incorporate it into your notes.
The document or image you import will also be treated as an attachment rather than a note, but, depending on the file type, some editing may still be available.
You can annotate and mark up an image file (JPG / PNG) inside Notes in the same way as a PDF, by tapping on the attachment and then selecting the pen button at the top of the page. However, for something like an RTF, no editing or markup options are available.
If you need to get the information out of the attachment and into the body of the note document, you’ll need to open the attachment, select your desired text, and then copy/paste it into the body of the note. It’s a convoluted and non-intuitive process, but it can be done.
These difficulties are also where the Apple ecosystem comes into play. While importing is limited to some devices, Apple relies on other devices in the ecosystem to pick up the slack.
For example, if you have a huge block of text you want to move into Notes, it might be easier just to copy/paste it into Notes on your Mac and wait for iCloud to sync it over, rather than emailing, importing, and trying to find workarounds.
Universal Clipboard is also built into macOS and iOS and is essentially a copy-and-paste clipboard. When you copy something to your clipboard, it’s automatically copied to all your Apple devices, so you can paste something from one to another quickly and easily.
Between the new ability to attach PDFs, the scanner, and the Universal Clipboard, you should be able to add anything you need to your notes.
Exporting & saving
When you need to move your notes out of Apple Notes, you’ll have a few options.
All your Apple devices will automatically save and sync your Apple Notes via iCloud, making it easy to move them from one Apple device to another in a seamless way.
Protip: Keep in mind that you only get so much iCloud storage, but you can buy more inside your iCloud settings.
Other apps like Evernote or OneNote allow you to automatically back up to Google Drive, Dropbox, or Microsoft OneDrive. While you can also use third-party apps to move your Apple Notes out of the ecosystem, this comes with some downsides.
While it’s possible to export your notes as PDF files, you’ll have to select notes and send them one at a time. Additionally, because Apple Notes uses raster ink, exports can make your PDFs look blurry.
Also, Apple Notes are vertically infinite, which means you won’t have any idea where your pages will start and end. As a result, you may end up with very inconvenient page breaks and no way to fix them.
While Apple Notes doesn’t make it easy to export out of their system, it is still possible with a little work.
It’s also worth noting that your export won’t impact the original note stored in the system. Your notes are still backed up to iCloud, so you’ll only ever export a copy of your original note.
You can also share your notes in a variety of ways (more on this below).
Apple Notes: Unique features
Now that you’ve got an idea of how to use the basic tools, there are a few additional features that are worth a look.
In this section of our Apple Notes review, we’ll take a closer look at some of these useful tools.

Collaboration
Apple Notes includes collaboration features for shared folders and shared notes.
You can share a note by tapping the Share button in the top right. This will bring up a list of your sharing and export options. When you choose Collaborate from the drop-down menu, you can also edit the rules and permissions.
These include allowing anyone with the link or only invited people to access your shared note, and allowing others to invite users to collaborate. You can also change the permissions to allow others to make changes to your note, or you can set users to view only if you just want to share the content.
All collaborators must be signed in with their Apple ID to access or edit the note. Once everyone is signed in, you can tag other users, highlight important sections of text, and collaborate together to build a better document.
You can send invitations to collaborate through Messages or FaceTime, and everyone in the thread will automatically be added to the note. Once a note has collaborators, you can also start a Message, FaceTime audio, or FaceTime video call with the group from the note.

Quick Notes
Quick Notes allow you to quickly jot down a thought without having to open the Apple Notes app.
You can:
- Open this feature from anywhere on your iPad by dragging upward from the bottom-right corner.
- Open a Quick Note from your lock screen by tapping it with your Apple Pencil.
- Attach a link to your Quick Note.
- Associate a website with your Quick Note, so when you open the website, the note pops up too.
Once you’ve created your Quick Note, you can move it to any corner of your screen or dismiss it entirely.
Your Quick Notes will show up in their own folder in Apple Notes for future access.
Checklists / tables
Most notetaking apps don’t allow you to create a to-do list with checkboxes or tables unless you draw them yourself, but it’s possible to do both using Apple Notes.
Checklists. With Apple Notes, you can create an interactive checklist to mark off items as you complete them. Items will then automatically move to the bottom of the list. (This feature can be disabled in Settings.)
Tables. Use the table icon on the bar above your keyboard to create a table. A two-by-two table will appear. You can add or delete as many columns and rows as you need, and you can make your text bold, underlined, or italicized. Apple Notes also allows you to convert text to a table or a table to text.
These two features help set Apple Notes apart, especially if you’ve been creating these items by hand in other apps.
Password protection
Ever store important information in your notes, such as the combination of your safe or passwords to websites? Then you’ll love the fact that Apple Notes allows you to lock your notes.
While some third-party apps (Notability) also offer this feature, Apple Notes takes full advantage of Apple's onboard security features to keep your notes secure.
With Apple Notes, you can create a password to protect your notes, but you can also use FaceID or TouchID to keep everything secure.
Protip: You can only lock notes stored in iCloud. If your notes sync with third-party services like Gmail or Yahoo, they can’t be locked.
Data detection
Apple Notes can recognize data such as phone numbers, addresses, dates, and email addresses, and allows you to interact with them.
For example, if you type an email address, Apple Notes lets you send an email, start FaceTime, save to contacts, and more. With a date, you can create an event or reminder, or add it to your calendar.
The best part?
Apple Notes is also integrated with Contacts, Calendar, Reminders, and other elements of the operating system, which makes planning events or creating reminders quick and easy.
Final verdict
While serious notetakers may find Apple Notes lacking in certain areas, this notetaking tool has many great features that make it perfectly functional and unique.
For serious notetakers, the combination of versatility and pricing are major factors to consider. By using Apple Notes, you’re taking advantage of a robust operating system and all of the apps associated with it.
Remember, when Apple Notes recognizes a date or needs to store an image, other iOS apps like Calendar, Photos, or Contacts will assist Notes in handling your data and helping you do even more with it.
You won’t find that level of native integration in any other notetaking app.
Apple Notes features tools like Quick Notes, Universal Clipboard, and more, so you can quickly capture the information you need.
Organizing and navigating through the system is simple and intuitive, and the advanced search and sharing capabilities give this app the important features every notetaker needs.
Plus, creating tables and checklists are pretty unique features that you won’t see anywhere else.
As a bonus for users who are completely bought into the Apple ecosystem, the ability to pass notes between Apple devices is more seamless than any other notetaking app available.
Plus, did we mention that Apple Notes is completely free?
Frequently Asked Questions
Is Apple Notes any good?
A: As a free app, Apple Notes is missing some of the features that notetakers have come to expect in their paid apps. However, Apple Notes contains a lot of great tools that certainly make it worth trying before paying for advanced features you might not use.
We’ve covered the app in detail in our review so that you can determine if it’s right for you. You can also check out the Best Notetaking Apps for iPad for some good alternatives if you don’t feel Apple Notes has everything that you need.
What’s Freeform?
A: Apple also has an app called Freeform that’s designed for visual collaboration and brainstorming.
Freeform is not part of Apple Notes and differs in its capabilities. Instead of a place to take notes or jot down your thoughts, it’s built like an infinite, flexible canvas for drawing, writing, and connecting ideas.
The toolkit is also different from Apple Notes. You won’t find all the pen and pencil options available in Notes, but you will have some unique tools, such as the crayon tool and the fill tool, that make it better for drawing and designing.
Apple Notes doesn’t handle mixing text and handwriting very well, but Freeform allows you to drag and drop any kind of content onto the board in any location.
Like Apple Notes, Freeform offers collaboration, and it even has FaceTime built right into the app. Its collaborative capabilities seem to exceed what you can do with Notes, and you have up to 100 collaborators on one project board.
Can I open Apple Notes on Windows?
A: While Apple Notes lacks a Windows version, there are a couple of ways you can use the app on your PC.
The first is to open iCloud through your web browser, sign in with your Apple ID, and click on Apple Notes. You can access, edit, and create new notes here, just like you would in the app. And, they’ll even sync to all your other Apple devices when you’re done.
Your other option is to use Gmail, Microsoft Outlook, or Yahoo to access your notes. To integrate these accounts, you’ll need to go to Settings > Notes > Accounts > Add Account on your iPad or iPhone. Unfortunately, most of these only allow you to view your notes, not edit them, so you’re better off going through iCloud on your web browser.
What other hardware do I need in order to use Apple Notes?
A: Since Apple Notes is automatically installed on any Apple device, you’ll need either an iPad, Mac, or iPhone to use it.
We recommend using the iPad Pro, and you’ll also want an Apple Pencil if you plan to take handwritten notes.
If you prefer handwriting your notes, our Screen Protector gives friction to the surface of your iPad, so it feels like writing on paper.
Read next